
Introduction
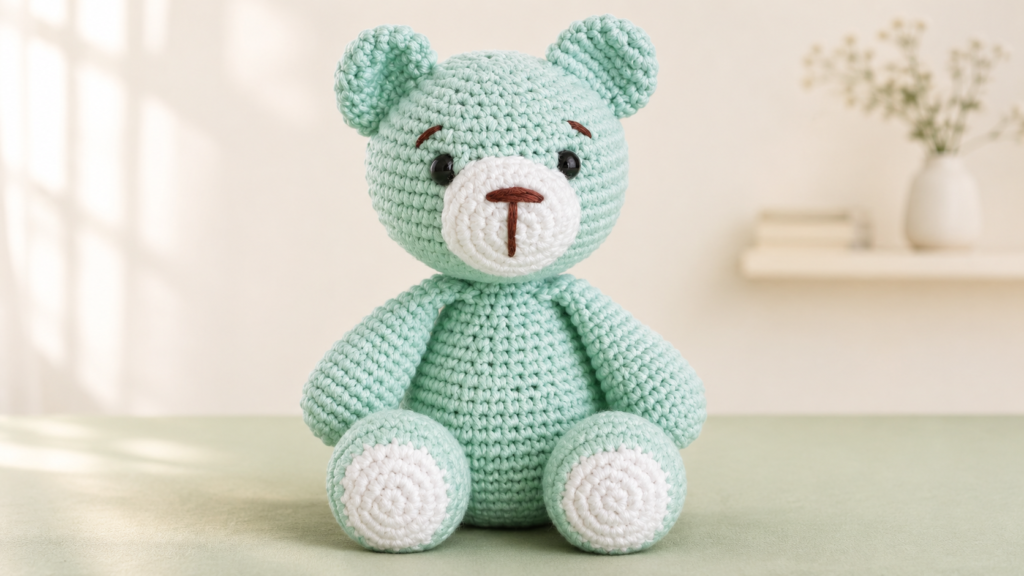
Meet the Confite Friends Bear, an adorable amigurumi bear that makes a lovely handmade companion or a thoughtful gift for someone special. With its charming expression, cute little ears, and soft crochet body, this bear is a delightful project for amigurumi lovers.
This pattern includes instructions for crocheting the arms, legs, body, head, ears, tail, and muzzle, followed by assembly and embroidery details. You can customize the facial expression and positioning to give your bear its own personality.
Prefer a more convenient crochet experience? A premium PDF version of this pattern is available, featuring step-by-step photos and an ad-free format to help you follow the instructions comfortably. You can find it using the button below the article.
Materials
- Size 3/light weight yarn in 2 colors
- 150 yards / 138 meters of main color
- 25 yards / 23 meters of contrasting color
- 2.5 mm crochet hook
- 8 mm safety eyes
- Fine yarn or embroidery thread for nose and face details
- Scissors
- Yarn needle
- Stitch markers
- Fiberfill
Abbreviations (US Terms)
- ch: chain
- sc: single crochet
- inc: single crochet increase, 2 single crochet from same stitch.
- dec: single crochet decrease, 2 single crochet closed together
Invisible Decrease
I prefer the invisible decrease than regular sc2tog.
To make invisible decrease follow this:
- Insert your hook into the front loop for the next stitch.
- Yarn over (yo) and draw the yarn through the stitch. Insert your hook into the front loop for the next stitch.
- Yarn over (yo) and draw the yarn through the stitch. Yarn over and draw the yarn through all 3 loops on your hook.
Gauge / Tension
Not important, just make sure to work tight and use a crochet hook smaller to the recommended for the yarn to ensure that stuffing does not show through or fall out.
Finished Size
Bear measures 6 inches tall in seated version and 7 inches tall in standing position.
Arms (Make 2)
Using main color:
- Round 1: 6 sc in magic ring [6]
- Round 2: inc into each stitch [12]
- Round 3: (sc, inc) x 6 [18]
- Round 4 – 8: sc in the next 18 stitches [18]
- Round 9: (4 sc, dec) x 3 (add the stuffing) [15]
- Round 10 – 12: sc in the next 15 stitches [15]
- Round 13: (3 sc, dec) x 3 [12]
- Round 14 – 17: sc in the next 12 stitches [12]
- Round 18: fold and make 5 sc taking both sides together. Fasten off, weave in the end.
Legs (Make 2)
Using contrasting color:
- Round 1: 6 sc in magic ring [6]
- Round 2: inc into each stitch [12]
- Round 3: (sc, inc) x 6 [18]
- Round 4: (inc, 2 sc) x 6 [24]
- Round 5: (3 sc, inc) x 6 [30]
- Round 6 – 8: sc in the next 30 stitches [30]
- Round 9: (4 sc, dec) x 5 [25]
- Round 10: sc in the next 25 stitches [25]
- Round 11: (3 sc, dec) x 3, 10 sc [22]
- Round 12: 6 dec, 10 sc [16]
- Round 13: 3 dec, 4 sc, dec, 4 sc (add the stuffing) [12]
- Round 14 – 19: sc in the next 12 stitches [12]
- Round 20: 8 sc, fold and make 5 sc taking both sides together. Fasten off and leave a long tail to sew it to the body.
Body and Head
- Round 1: 6 sc in magic ring [6]
- Round 2: inc into each stitch [12]
- Round 3: (sc, inc) x 6 [18]
- Round 4: (inc, 2 sc) x 6 [24]
- Round 5: (3 sc, inc) x 6 [30]
- Round 6: (inc, 4 sc) x 6 [36]
- Round 7: (5 sc, inc) x 6 [42]
- Round 8: (inc, 6 sc) x 6 [48]
- Round 9 – 14: sc in the next 48 stitches [48]
- Round 15: (6 sc, dec) x 6 [42]
- Round 16: sc in the next 42 stitches [42]
- Round 17: (dec, 5 sc) x 6 [36]
- Round 18: sc in the next 36 stitches [36]
- Round 19: (4 sc, dec) x 6 [30]
- Round 20: sc in the next 30 stitches [30]
- Round 21: (dec, 3 sc) x 6 [24]
- Round 22: sc in the next 24 stitches [24]
- Round 23: (2 sc, dec) x 6 [18]
- Round 24: sc in the next 18 stitches [18]
- Round 25: 5 sc taking the first arm, sc in the next 3 stitches, 5 sc taking the second arm, sc in the next 5 stitches [18] From here add stuffing as you go.
- Round 26: sc in the next 18 stitches [18]
- Round 27: (dec, sc) x 6 [12]
- Round 28: inc into each stitch [24]
- Round 29: (3 sc, inc) x 6 [30]
- Round 30: (inc, 4 sc) x 6 [36]
- Round 31: (5 sc, inc) x 6 [42]
- Round 32: (inc, 6 sc) x 6 [48]
- Round 33: (7 sc, inc) x 6 [54]
- Round 34 – 40: sc in the next 54 stitches [54]
- Round 41: (dec, 7 sc) x 6 [48]
- Round 42: (6 sc, dec) x 6 [42]
- Round 43: (dec, 5 sc) x 6 [36]
- Round 44: (4 sc, dec) x 6 [30]
- Round 45: (dec, 3 sc) x 6 [24]
- Round 46: (2 sc, dec) x 6 [18]
- Round 47: (dec, sc) x 6 [12]
- Round 48: dec x 6 [6]
Fasten off, cut yarn, close hole and weave in end.
Safety Eyes
Place the safety eyes between rounds 39 and 40 with 8 stitches of separation; they should go in side where less separation between arms.
Sew legs between rounds 8 and 11 aligned with arm in body.
Tail
- Round 1: 6 sc in magic ring [6]
- Round 2: (inc, 2 sc) x 2 [8]
- Round 3 – 4: sc in the next 8 stitches [8]
Fasten off leave long tail sew between rounds 8 and 10 in body.
Ears (Make 2)
- Round 1: 6 sc in magic ring [6]
- Round 2: inc into each stitch [12]
- Round 3: sc in next 12 stitches [12]
- Round 4: (sc, inc) x 6 [18]
- Round 5: sc in next 18 stitches [18]
- Round 6: dec x 3, sc in next 12 stitches [15]
- Round 7: dec, slip stitch in next stitch.
Fasten off leave long tail sew between rounds 4 and 9 from center of head.
Assembly
If you don’t want the sit position, sew the last row of the leg to the round 11 of the body. I made some extra stitches between rounds 5 and 6 from top of the leg to secure them more but this is optional.
Muzzle
Using contrasting color:
- Round 1: 6 sc in magic ring [6]
- Round 2: inc into each stitch [12]
- Round 3: (sc, inc) x 6 [18]
- Round 4: (inc, 2 sc) x 6 [24]
- Round 5 – 6: sc in next 24 stitches [24]
Fasten off leave long tail sew muzzle between rounds 10 and 17 from center of head.
Embroidery
Embroider the nose and eyebrows as you prefer, I did “T” nose. Also make a white line under the eyes to give more expressiveness to the look.
Finished Look Tip
You can adjust the shape and placement of the nose and eyebrows to give your bear a unique and expressive look.
Conclusion
Your Confite Friends Bear is now ready to become a lovely handmade companion! Enjoy customizing its expression, choosing your favorite yarn colors, and creating a bear that feels uniquely yours.
If you prefer working from a printable pattern with step-by-step photos and no advertisements, the premium PDF version is available through the button below the article. It offers a more convenient way to follow the instructions while crocheting.
Happy crocheting!